Red Strapless Evening Gown
Red Strapless Evening Gown
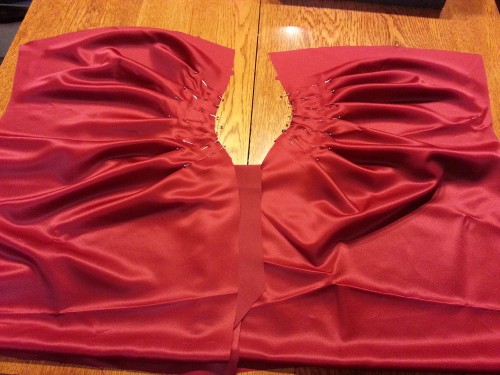
Okay, this is SO not me. I made it to see if I could successfully make a strapless gown that stayed in place. This particular gown has pleats on both the front and back on one side, and a side slit up the leg. The other side has an invisible zipper. It is fully lined, and has a boned inner corselette. The fabric is a darker red satin, and the lining is the same color. The interlining is made from lining fabric and sewn in interfacing. I found the fabric on sale for 60% off, so the fabric cost was under $20. I had picked up the pattern a month or so ago, and cut out some of the pieces, but I wasn't convinced about the foundation, and so I procrastinated on it. I looked through the dressmaking books I have, but they didn't adequately address the questions I had. I found a few links to a book that is no long in print, and costs as much as a new fancy dress, and so I wishlisted it but was not going to spend a lot of money on a book that might or might not be the end all be all. Continuing my search, I found a few pictures online of some couture dress inner workings that piqued my interest, and I found a pattern for a long line bra that could be adapted to a corselette, but I had to order hardware and notions in order to go that route, so once again, the project was put on hold. And I really was not convinced that was the way to go for this exact dress. The pattern itself calls for a tight fitting corset-like interlining, but it is attached to the dress at the top and zipper seams, and it didn't have cups. So once again, it would rely completely on a perfect fit to keep everything in place, and that was the exact issue I am trying to get away from. But, I am also trying to avoid needing to wear bras or any supporting garment underneath this, because I believe a well-made fitted dress should have it's own foundation, and so I was determined to solve the foundation issue. Then, in one of those weird twists of fate, a friend that I am working on a website for sent me her artwork in the mail, and included THE EXACT SAME BOOK I WANTED. I hadn't mentioned it to her (why would I?!?) and so I sat in my chair, a little stunned, and completely weirded out. How in the hell?!?! A note enclosed said she had bought it years before, didn't use it, and thought I might be able to use it. MIGHT be able to use it?! It was the answer to my problems! It contains details instructions on the innerworkings, along with how to make them happen, why they work, and how to tweak the fits. I learned SO much from reading that book. Motivated once again, I started cutting out the rest of the pattern pieces for the red gown, and committed to sewing it mostly as it was set out in the instructions. That next weekend, I went with my bff to watch her try on wedding gowns, and I and the other girls tried on bridesmaid dresses; that was the most amazing experience. First, any bride to be just looks stunning in wedding gowns, and so it was just a fun day. Being in a higher end boutique with all the amazing gowns was almost too much - the endless details and changes and construction methods was nearly overwhelming. I took pictures of things I wanted to make notes of later, and watched how things worked and hung and lay and how they looked on a person. After I got home, I KNEW I was on the right path, and so I once again picked up the red dress, this time with determination. I sewed for over six hours that night, and only stopped because I was short half a yard of the interlining fabric and couldn't continue. The dress took me two evenings to make, and would have been done last week, except the damn zipper broke AFTER the dress was finished. This wasn't the first time this has happened to me, either. Spending about 20 seconds on google led me to several posts by sewers who said the same thing; the Coats and Clark zippers sold at most fabric stores are complete crap. :SIGH: I ripped it out, angrily, and ordered YKK zippers from some dry cleaner supplier online, and waited. AGAIN. This was turning out to be the project of starts and stops!! The zippers came in on Wednesday, I put one in on Thursday night, and hemmed the dress on Friday night. And then I was too tired to take pics, and so I am just now getting around to taking them. The pleating is formed directly on the upper layer; I am going to try draping techniques to recreate something similar, now that I understand how this works.This is the front and back pieces; they are each one piece. The pleats are pinned in place, and the formerly odd shaped rectangles of fabric suddenly become distinctly dress shaped. I basted the pleats, and then sewed the two pieces together on the one side seam. The lining is also just two pieces, shaped like these after the pleats are pinned in; it also was sewn up one side seam.
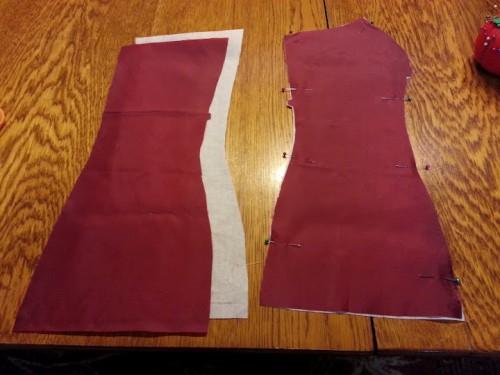
Two of the four interlining pieces. They are curved to ease over the bust, waist, and hips. The interfacing is sewn onto the lining fabric to provide structure. Bones are added in the middle of the side and back pieces. (I didn't get any more pictures of the interlining, the damn dress went together too fast!!)
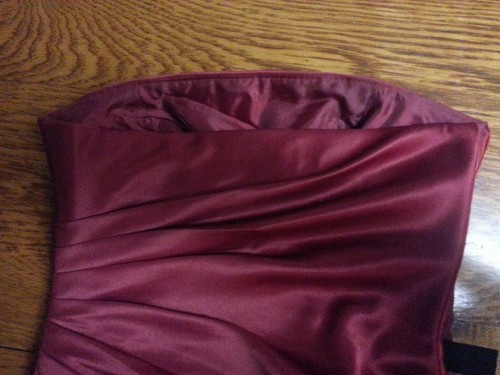
The interlining is sewn into the dress front and back; then the lining is sewn to the dress, right side to right side. This encloses the interlining and all of the seams. The lining is stay stitched to the dress in the seam allowance; you can see the stitches in the lining at the very top of the gown, but you cannot see the stitching on the outside of the gown. This makes the outside much prettier and gives it a nicer finish, while the staystitching ensures the lining doesn't creep above the fashion fabric while wearing it. This picture was taken after I put the broken zipper in; I had one try on of the dress before the zipper broke, and I'm glad I did - the dress was not, in spite of the boning, staying up. While I waited for the new zippers to arrive, I researched how to get this dress to stay where I meant for it to stay. And, admittedly, I was a bit perplexed. If the boning is supposed to hold it up, why was it moving?? I flipped through my books, this time looking specifically for waist stays. Which it turns out those aren't just to keep the waist from easing, it's also to anchor the garment so that the top doesn't move. Only I knew it didn't work on it's own; and I found the answer to that on another dressmaker's blog - the boning is sewn to the waist stay so that it cannot move downwards - it has to stay exactly anchored at the waist, which keeps the rest of it where it's supposed to be!! PROBLEM SOLVED!!! I cut 1" gingham ribbon to my waist measurement plus two inches; sewed a hook at one end, a few flat eyes at the other end, and tried it to make sure it fit. It did. ; ) Then, I attached the side point inside the dress to the side of the interlining; added two buttonholes in the lining so the ends would be on the outside of the lining, but the rest would be inside the lining (and therefore invisible). It took only a few minutes to sew around each of the bones, fastening them to the stay. The rest of the ribbon and corselette were not attached; this leaves room for the dress to move, to it hangs naturally. Once I tried the dress on, I as AMAZED at what a difference that stupid piece of 1" ribbon made. Not only did the dress stay exactly in place while I stood there, it also stayed exactly in place while I cleaned my mirror with windex, which suddenly seemed SO important that it couldn't wait until I was in regular clothes again. (Actually, I was going to take a pic in the mirror to mark a few details, but didn't want all of Clementine's slobber to be visible. ; )
The only thing left to do was the hem, and taking the lining, and the dress was done! I did tack the lining slightly off the first time, and the satin didn't hang properly, so I ripped out the seams and re-set them. I am SO glad I did, now it lays perfectly.
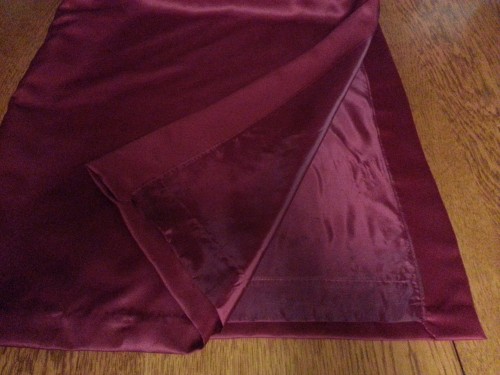
The lining is tacked to the satin all the way to the bottom of the slit, and the rest of the lining hem is free from the gown. This helps the fabric to hang better, and allows the satin to flow over the lining without getting caught up anywhere.
And finally, pictures of the finished dress.
The fit is EXACTLY perfect for me. Which I can't take credit for; I just happen to be the exact same size as the commercial pattern companies' size 12, with minimal adjustments. Usually I just pull in the zipper seam an extra half inch and it fits perfectly. And yes, I know how lucky that is!
I cannot imagine wearing this in public, it just seems so.... Jessica Rabbit, I guess. I feel kind of naked in it, I never wear anything that revealing. But at least the top stays up!!! :o)


Comments